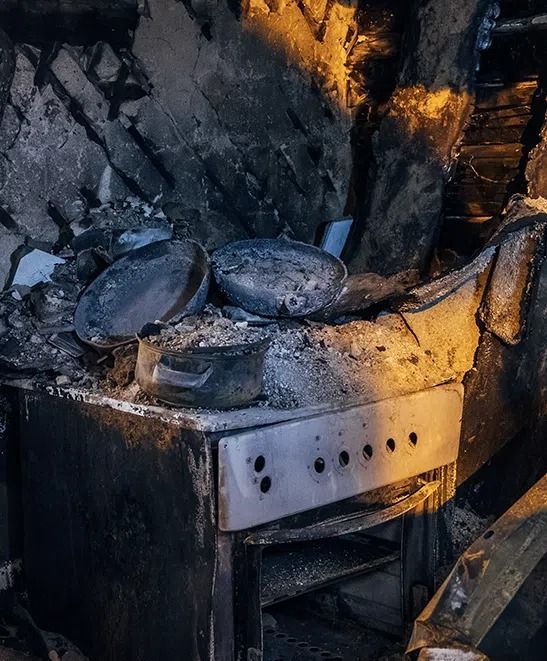
Fire and Smoke Restoration

icon

DIY vs. Professional Drying Water damage looks deceptively simple at first glance. Floors are wet, maybe a rug or two is soaked, and everything feels manageable with a few box fans. But structural drying is one of those situations where the surface rarely tells the full story. Understanding the difference between DIY vs. professional drying helps you avoid the hidden moisture that leads to mold, warped materials, and long-term repairs that no one wants to face months later.

DIY vs. Professional Drying – Start With the Type and Source of Water When Choosing

Before deciding whether fans are enough, consider the type of water involved. Clean water from a supply line break is very different from dishwasher overflow, rain intrusion, or long-undetected leaks. Clean water damage caught immediately has the highest chance of successful DIY support. Anything that involves contaminated water, standing water, or unknown duration requires professional drying from the start. Time changes the category of water quickly, so even “clean” water becomes risky after 24–48 hours.

Fans Work for Surface Moisture – Not Structural Moisture

Fans can help with evaporation on carpets, tile, and hard surfaces, but they cannot measure or remove moisture inside walls, under baseboards, beneath vinyl, or inside insulation. These hidden pockets are exactly where mold begins to grow. Professional drying uses commercial air movers, dehumidifiers, and moisture meters that tell you, definitively, what is still wet. Without measurement, DIY drying is guesswork. If you’re unsure how far the water traveled, the safer move is a professional assessment.

When DIY Makes Sense

There are situations where DIY efforts are useful and appropriate. Small spills, isolated appliance leaks caught immediately, or minor overflows in non-porous areas often benefit from towels, airflow, and monitoring. If the water stayed on a sealed surface and didn’t reach the walls or subfloor, fans may be enough. Even then, it’s wise to check for musty smells over the next few days—one of the earliest signs that moisture traveled further than expected.

When Professional Drying Is Non-Negotiable

If the water reached drywall, trim, cabinetry, carpet padding, laminate, or wood flooring, DIY drying is rarely sufficient. These materials absorb and hold moisture, and once saturated, they dry unevenly and slowly. Professionals use negative-pressure systems, dehumidification, and targeted airflow designed to protect building materials from secondary damage. They can also detect when moisture has reached structural framing, which requires a controlled dry-out to avoid long-term issues like swelling or rot.

Insurance Expectations Matter

Homeowners are expected to “mitigate further damage” as soon as possible. Calling a professional satisfies that requirement, creates a documented drying log, and ensures your claim isn’t questioned later. DIY drying without documentation can sometimes complicate insurance review if problems surface weeks or months down the road.

DIY vs. Professional Drying –  Professional Drying Protects Your Home Long Term

Choosing between DIY vs. professional drying doesn’t need to be a guess. Fans help with small, contained situations. Professionals handle everything else—especially anything involving hidden moisture, large areas, or time-sensitive risks. Done correctly, drying is one of the most important steps in protecting your home’s structure and ensuring repairs don’t come back to haunt you.

First 24 Hours After Water Damage Water damage feels overwhelming because it arrives fast and leaves a mess that unfolds slowly. The first hours after a leak, overflow, or storm event are critical—not just for minimizing damage, but also for protecting your safety and keeping your insurance claim clean. The most effective approach is to focus on a sequence: stabilize, document, and act quickly without overreaching. Here’s how to navigate the first 24 hours after water damage with clarity.

Start With Safety Checks

Before anything else, make sure the area is safe to enter. If water is near outlets, appliances, or the breaker panel, avoid stepping in and do not attempt to unplug or move anything. Shut off the water source if you can safely reach it. If the ceiling is sagging or you see bubbling paint, do not stand underneath it—water-logged drywall can collapse without warning. These early steps keep preventable injuries off the table.

Document Everything Methodically

Insurance companies care deeply about timelines and evidence, so documentation during the first 24 hours after water damage can meaningfully affect your claim. Take wide-angle photos of each affected room, then move closer for detail shots of flooring, walls, baseboards, belongings, and furniture. Record the water source if visible. A simple video walkthrough—slow, steady, and narrated—creates a reliable timestamp. Keep a running log with the date, time, and what you observed. This doesn’t need to be polished; it just needs to be complete.

Prevent the Water Damage From Spreading

Once you’ve documented everything, there are safe steps you can take to limit the damage. Remove small items from the floor, lift curtains or drapes, and place foil or wooden blocks under furniture legs to avoid staining. If you have fans, turn them on, but avoid pointing them directly at wet drywall. If the weather allows, open windows to improve airflow. These measures slow moisture migration without interfering with the professional dry-out process.

Water Damage – Call a Restoration Professional Sooner Than Later

Water moves fast—into subflooring, under baseboards, behind cabinets. Even water that “looks like it dried” can leave moisture trapped where mold thrives. A restoration professional uses moisture meters, infrared imaging, and controlled airflow to dry the structure thoroughly. Calling within the first 24 hours helps ensure the damage is addressed before secondary issues form. It also helps with insurance, as carriers expect homeowners to act quickly to mitigate loss.

Understand What Can Wait

Not everything needs to happen right away. Avoid tearing out carpet, cutting drywall, or throwing away damaged items until a professional evaluates the extent of the damage. Premature demolition can complicate insurance documentation and may remove evidence adjusters need.

First 24 Hours After Water Damage – The First Day Sets the Tone

With the right steps, the first 24 hours after water damage become manageable. Prioritizing safety, documenting thoroughly, and bringing in a professional early gives you control over a stressful situation—and protects the long-term health of your home.

moisture detection Not all water damage makes itself obvious. Even after a visible leak is fixed, moisture can seep into crawlspaces, attics, or other hidden areas of the home. These quiet zones can become mold incubators if they’re not checked and dried properly. That’s why professional inspections and thorough moisture detection and mapping matter long after the visible puddles are gone.

Why Crawlspaces and Attics Are Problem Spots

Crawlspaces and attics have two things mold loves: low air circulation and high humidity. Water from roof leaks, plumbing issues, or foundation seepage can accumulate in these spaces and linger for weeks without being noticed. By the time musty smells appear, the mold has often already spread.

Without Moisture Detection, Small Leaks CanTurn Into Big Problems

A slow drip doesn’t look like much at first. But once moisture soaks into insulation, subflooring, or framing, it creates a perfect environment for fungal growth. Mold in these areas often spreads behind walls or under floors, making it harder and more expensive to remove the longer it sits.

Moisture Detection Goes Beyond the Surface

A clean-looking ceiling or dry floor doesn’t mean the job is done. Restoration professionals use moisture meters, infrared imaging, and airflow testing to identify damp zones you can’t see. Addressing these hidden pockets early prevents secondary damage and future remediation costs.

Proper Drying Prevents Mold Before It Starts

Drying crawlspaces and attics isn’t just setting up a fan. It often involves targeted dehumidification, insulation removal, vapor barrier work, and sometimes structural drying. The goal is to bring moisture levels down to safe, measurable standards—not just make the area look dry.

Mold Prevention Starts with Moisture Detection Where You Can’t See

Water cleanup isn’t complete until hidden areas are inspected, measured, and properly dried. Treating crawlspaces and attics as part of the restoration process helps protect your home from lingering damage and future mold growth.

Schedule a quick consult to ensure your attic or crawlspace isn’t hiding a lurking moisture problem.

water damage

Drying isn’t a guess; it’s measured. Walls can feel cool to the touch and still hold hidden moisture that leads to warping or mold later. The goal is objective proof: tools that see inside materials, daily readings that trend in the right direction, and a final sign-off that says the structure is back to its normal baseline. When you know what the numbers mean, you can ask better questions and feel confident about the finish line.

Is Water Damage Really Dry

Homeowners ask this all the time: are you sure the water damage is really dry? The answer comes from three things—infrared imaging, moisture meters, and a dry-standard comparison. IR shows temperature patterns that can suggest moisture, meters measure actual content by material, and “dry standard” means the normal level for that same area of your home (or a similar, unaffected material) under current conditions.

Infrared: Where to Point the Meters

Infrared (IR) cameras don’t measure moisture directly; they map surface temperatures. Wet areas often read cooler due to evaporation. That makes IR a great first pass to locate anomalies—dark, cool shapes around baseboards or beneath windows—so the technician knows where to probe with meters. IR is a pointer, not a verdict.

Moisture Meters: The Numbers That Matter

Pin meters drive tiny probes into material to read moisture content (MC) in percent for wood and relative scales for drywall and plaster. Pinless meters use a sensor pad to scan quickly without holes—ideal for large walls and ceilings. Readings are taken in the same locations daily to confirm progress. For wood framing, you’re often aiming below ~15% MC (context matters); for drywall, targets are relative to unaffected comparables.

Water Damage – Establishing the Dry Standard

Before drying starts, a tech takes baseline readings in unaffected areas: framing, drywall, cabinetry, subfloor. Those become the “dry standard.” The job isn’t finished just because readings went down; it’s finished when affected areas match the baseline within a reasonable tolerance and ambient conditions are stable.

What a Proper Sign-Off Looks Like

A good sign-off includes final meter readings, photos of meter displays at test points, and ambient RH/temperature. It should also document equipment removal and note any areas requiring rebuild. When you receive that packet, you’re not taking someone’s word—you’re looking at verified data that says the structure is ready.

If you want a second look, we can review a vendor’s readings and confirm whether the dry standard has truly been met before you move into repairs.

water damage claims

When water damage turns life sideways, the last thing you want is paperwork confusion. Clear documentation doesn’t have to be complicated or technical. Think of it as telling a simple, honest story: what happened, where the water went, what you did about it, and how you know the home is ready to rebuild. When that story is easy to follow, approvals tend to move faster.

Why Insurance-Ready Water Damage Evidence Matters

Carriers aren’t looking for drama; they’re looking for clarity. Insurance-ready evidence shows the problem, the plan, and the proof that each step made progress. It helps your adjuster say “yes” without a dozen back-and-forths—and helps future buyers (and their inspectors) understand the home was dried and repaired the right way.

Photos That Tell the Story

Start wide, then move closer:

  • Room shots from corners to show overall context.

  • Close-ups of damage patterns (wet baseboards, swollen flooring, staining).

  • Meter screens next to the surface being measured so numbers are visible.

  • Before / during / after so progress is obvious at a glance.
    Little touches help: a tape measure for scale, a sticky note labeling the wall (“North Wall, Living Room”), and brief captions like “Day 2—subfloor readings trending down.”

Simple Water Damage Logs You Can Keep

You don’t need a fancy form. A daily note works:

  • Date and time crews arrived/left

  • Room-by-room moisture readings (just list the spots you’re tracking)

  • Temperature and humidity (snap the dehumidifier display if easier)

  • Any changes (added an air mover, removed baseboard, opened a cavity)
    Consistency matters more than jargon. If you can skim the log and see progress day by day, so can your adjuster.

Insurance-Ready Water Damage Evidence: What Adjusters Expect

Most carriers are used to a few familiar elements:

  • Moisture map: a simple floor plan with numbered spots and readings.

  • Itemized scope: a clear list of tasks with quantities (extraction, dehumidification, HEPA air filtration, demolition, cleaning, rebuild).

  • Reason for each step: one-line explanations in plain language (“removed toe-kick to dry cabinet base”).

  • Final verification: photos of dry meter readings, plus any sign-off notes confirming targets were met.

Tips That Make Approval Easier

  • Photograph equipment placement on Day 1; it explains why fans and dehumidifiers were needed.

  • Label photos (“Hall Bath—South Wall”) so they’re easy to match to the moisture map.

  • Keep everything in one folder by day. If you’re emailing, send a single, organized packet instead of scattered attachments.

  • Ask your mitigation team to include a short summary up front: what failed, what got wet, what the plan was, and when goals were reached.

Clear, consistent documentation protects your claim and your home. If you want help assembling the packet, our team includes labeled photos, daily logs, moisture maps, and a clean scope so your adjuster can approve without guesswork.

Get Started Today

Contact Us